Input

book: Create a structured PDF document with headings, chapters, etc.
webpage: Specifies that the HTML sources are unstructured (plain web pages.) A page break is inserted between each file or URL in the output.
continuous: Specifies that the HTML sources are unstructured (plain web pages.) No page breaks are inserted between each file or URL in the output.
Title of the document for the front page.
Extract the first heading of the document and use it as title. If checked the title field has no effect.
The title image or HTML page. These file has to be an attachments!
Specify document version to be displayed on the title page.
Intellectual property owner of this document.
Copyright notice for this document.
Information about who and when modified the document are applied at the end.

Output

Specifies the output format.
Grayscale document  Title page
Compression :   JPEG big images 

Pagina

 
User defined page size 
Choose one of the predefined standard sizes or select user defined.
Specifies the page size using a standard name or in points (no suffix or ##x##pt), inches (##x##in), centimeters (##x##cm), or millimeters (##x##mm).
Set the target browser width in pixels (400-1200). This determines the page scaling of images.
   2-Sided   Landscape


Specifies the margin size using points (no suffix or ##x##pt), inches (##x##in), centimeters (##x##cm), or millimeters (##x##mm). Keep empty for default value.
Left
Middle
Right
Sets the page header to use on body pages.
Left
Middle
Right
Sets the page footer to use on body pages.

Indice

Sets the number of levels in the table-of-contents. Empty for unlimited levels.
   Numbered headings Check to number all of the headings in the document.
Sets the title for the table-of-contents. Empty for default title.
Left
Middle
Right
Sets the page header to use on table-of-contents pages.
Left
Middle
Right
Sets the page footer to use on table-of-contents pages.

Colors

Enter the HTML color for the body (background).
Enter the image file for the body (background). These file has to be an attachments!
Enter the HTML color for the text.
Sets the color of links.
Enables generation of links in PDF files.

Fonts

Set the default size of text.
Set the spacing between lines of text.
Choose the default typeface (font) of text.
Choose the default typeface (font) of headings.
Set the size of header and footer text.
Choose the font for header and footer text.
Change the encoding of the text in document.
Check to embed font in the output file.

PDF

Controls the initial viewing mode for the document.
Document: Displays only the docuemnt pages.
Outline: Display the table-of-contents outline as well as the document pages.
Full-screen: Displays pages on the whole screen; this mode is used primarily for presentations.
Controls the initial layout of document pages on the screen.
Single: Displays a single page at a time.
One column: Displays a single column of pages at a time.
Two column left/right: Display two columns of pages at a time; the first page is displayed in the left or right column as selected.
Choose the initial page that will be shown.

Security

Check to number all of the headings in the document.
 Versione stampabile   Modify
 Copy   Annotate
Specifies the document permissions.
Specifies the user password to restrict viewing permissions on this PDF document. Empty for no encryption.
Specifies the owner password to control who can change document permissions etc. If this field is left blank, a random 32-character password is generated so that no one can change the document.

Expert

Specify language to use for date and time format.
Shrink code blocks on page.
Show line numbers for code blocks.
Make spaces visable by dots (·) instead of white spaces.
Make line breaks visable by a extra character (¶) at the end.
Enable this feature if you searching for problems or intent to report a bug report

About

Version 2.4.2 (MoinMoin 1.9.7)


MoinMoin - Generate PDF document using HTMLDOC

This action script generate PDF documents from a Wiki site using
the HTMLDOC (http://www.htmldoc.org) software packages which has
to be preinstalled first.

Copy this script in your's MoinMoin action script plugin directory.

Thanks goes to Pascal Bauermeister who initiated the implementaion.
Lot of things changes since then but the idear using HTMLDOC is the
main concept of this implementation.

Please visit the homepage for further informations:
http://moinmo.in/ActionMarket/PdfAction

@copyright: (C) 2006 Pascal Bauermeister
@copyright: (C) 2006-2010 Raphael Bossek <raphael.bossek@solutions4linux.de>
@license: GNU GPL, see COPYING for details


Italiano English
Modifica History Actions

AccessPointEsterno

Come preparare un access point per l'esterno

Viste le numerose richieste, dovendo preparare un access point da abbinare in una postazione già attiva, ho fatto alcune foto, tanto per far vedere come risulti estremamente semplice progettare e costruire un qualcosa che può essere messo su un palo, utile ad accedere alle reti wi-fi.

Si tratta di assemblare un apparato qualsiasi, nel mio caso il famoso linksys WRT54G in una scatola elettrica da esterni, stagna, ed accoppiarlo ad una antenna a pannello da 6 dB circa. Mi sono subito recato a prendere i materiali, tra cui una scatola Gewiss 44ce, siglata come gw44208 (misura 240X190x90) e tre staffe ad U.
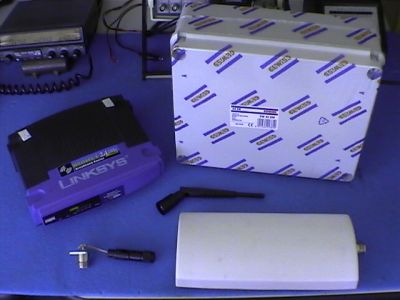
APEsterno1.jpg

Ho dapprima verificato come posizionare l’apparato dentro, in relazione al materiale che dovevo installare e, soprattutto, in relazione all’antenna da installare e alla lunghezza del cavo rf per alimentarla. Ricordo che più è corto il cavo rf, meglio è, per non perdere molta radiofrequenza in uscita, e per non lasciare libero cavo rf, facilmente oggetto di interferenze dall’esterno (magari, da altri access point installati in zona….).

Trovata la giusta disposizione, ho praticato prima i due fori per la staffa da palo, sul fondo della scatola (rispettando appunto l’orientamento e la polarizzazione dell’antenna stessa). Poi ho praticato i due fori, quello del connettore d’antenna e quello relativo al passaggio del cavo ethernet per il collegamento al computer e alla alimentazione.
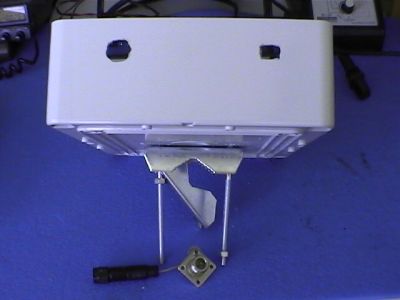
APEsterno2.jpg

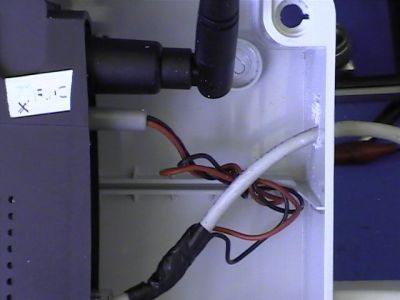
Nel mio caso, ho preso l’antenna originale del linksys, ho tagliato la plastica esterna, ed ho recuperato il connettore originale, collegato ad uno spezzone di cavo rf originale non molto lungo, alla cui estremità ho saldato un connettore N da pannello. In questo modo, ho addossato l’antenna direttamente alla scatola, e collegarla direttamente al connettore da pannello messo.
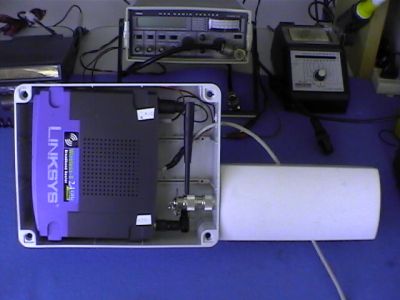
APEsterno3.jpg

Altre due foto, per far vedere il particolare del connettore d’antenna e l’alimentazione 12 volt attraverso lo stesso cavo ethernet, utilizzando il solito “power over ethernet”, con le due coppie inutilizzate del cavo originale.
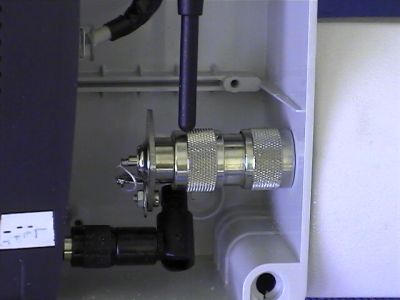
APEsterno4.jpg

APEsterno5.jpg

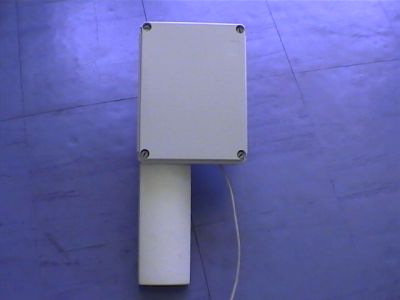
Per finire, l’installazione, ho inzeppato con materiale di riempimento, per evitare movimenti non voluti, utilizzando quella plastica a bolle per imballaggi, siliconato i due fori di uscita, ed anche quelli relativi alla staffa, per evitare rientri di acqua, e volutamente lasciata aperta sulla scatola, sul lato che risulta più basso, una piccola apertura, che permetterà l’eventuale scarico della condensa per gravità. Ecco il risultato, in poco più di venti minuti, tra buchi con il trapano e via dicendo.
APEsterno6.jpg

A presto, buoni smanettamenti, Luca.(ik0yyy)