Input

book: Create a structured PDF document with headings, chapters, etc.
webpage: Specifies that the HTML sources are unstructured (plain web pages.) A page break is inserted between each file or URL in the output.
continuous: Specifies that the HTML sources are unstructured (plain web pages.) No page breaks are inserted between each file or URL in the output.
Title of the document for the front page.
Extract the first heading of the document and use it as title. If checked the title field has no effect.
The title image or HTML page. These file has to be an attachments!
Specify document version to be displayed on the title page.
Intellectual property owner of this document.
Copyright notice for this document.
Information about who and when modified the document are applied at the end.

Output

Specifies the output format.
Grayscale document  Title page
Compression :   JPEG big images 

Pagina

 
User defined page size 
Choose one of the predefined standard sizes or select user defined.
Specifies the page size using a standard name or in points (no suffix or ##x##pt), inches (##x##in), centimeters (##x##cm), or millimeters (##x##mm).
Set the target browser width in pixels (400-1200). This determines the page scaling of images.
   2-Sided   Landscape


Specifies the margin size using points (no suffix or ##x##pt), inches (##x##in), centimeters (##x##cm), or millimeters (##x##mm). Keep empty for default value.
Left
Middle
Right
Sets the page header to use on body pages.
Left
Middle
Right
Sets the page footer to use on body pages.

Indice

Sets the number of levels in the table-of-contents. Empty for unlimited levels.
   Numbered headings Check to number all of the headings in the document.
Sets the title for the table-of-contents. Empty for default title.
Left
Middle
Right
Sets the page header to use on table-of-contents pages.
Left
Middle
Right
Sets the page footer to use on table-of-contents pages.

Colors

Enter the HTML color for the body (background).
Enter the image file for the body (background). These file has to be an attachments!
Enter the HTML color for the text.
Sets the color of links.
Enables generation of links in PDF files.

Fonts

Set the default size of text.
Set the spacing between lines of text.
Choose the default typeface (font) of text.
Choose the default typeface (font) of headings.
Set the size of header and footer text.
Choose the font for header and footer text.
Change the encoding of the text in document.
Check to embed font in the output file.

PDF

Controls the initial viewing mode for the document.
Document: Displays only the docuemnt pages.
Outline: Display the table-of-contents outline as well as the document pages.
Full-screen: Displays pages on the whole screen; this mode is used primarily for presentations.
Controls the initial layout of document pages on the screen.
Single: Displays a single page at a time.
One column: Displays a single column of pages at a time.
Two column left/right: Display two columns of pages at a time; the first page is displayed in the left or right column as selected.
Choose the initial page that will be shown.

Security

Check to number all of the headings in the document.
 Versione stampabile   Modify
 Copy   Annotate
Specifies the document permissions.
Specifies the user password to restrict viewing permissions on this PDF document. Empty for no encryption.
Specifies the owner password to control who can change document permissions etc. If this field is left blank, a random 32-character password is generated so that no one can change the document.

Expert

Specify language to use for date and time format.
Shrink code blocks on page.
Show line numbers for code blocks.
Make spaces visable by dots (·) instead of white spaces.
Make line breaks visable by a extra character (¶) at the end.
Enable this feature if you searching for problems or intent to report a bug report

About

Version 2.4.2 (MoinMoin 1.9.7)


MoinMoin - Generate PDF document using HTMLDOC

This action script generate PDF documents from a Wiki site using
the HTMLDOC (http://www.htmldoc.org) software packages which has
to be preinstalled first.

Copy this script in your's MoinMoin action script plugin directory.

Thanks goes to Pascal Bauermeister who initiated the implementaion.
Lot of things changes since then but the idear using HTMLDOC is the
main concept of this implementation.

Please visit the homepage for further informations:
http://moinmo.in/ActionMarket/PdfAction

@copyright: (C) 2006 Pascal Bauermeister
@copyright: (C) 2006-2010 Raphael Bossek <raphael.bossek@solutions4linux.de>
@license: GNU GPL, see COPYING for details


Italiano English
Modifica History Actions

FoneraViaCom

Fonera via com:

Allora questo tutorial cerca di spiegare come realizzare un interfaccia per comunicare con la fonera e poi il modo con cui flashare la fonera via com.

Iniziamo:

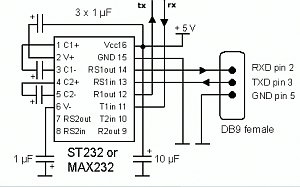
La costruzione del circuito è relativamente semplice lo schema da seguire è questo:
rs232-ttl.jpg

Io lo ho realizzato con una breadboard così non ho avuto problemi di saldature di nessun genere. i componenti necessari sono:

  • Circuito integrato max232
  • Connettore RS232(com) femmina 9 pin
  • 4 condensatori elettrolitici 1µF
  • 1 condensatore elettrolitico 10µF
  • Breadboard

Una volta costruito il circuito il max 232 deve essere alimentanto con una corrente stabilizzata a 5v, per fare questo io ho usato un caricatore per nokia che si connetteva all'usb ma qualunque metodo va bene purchè la corrente sia 5v e costante.

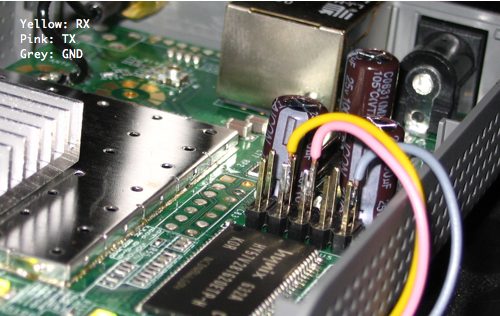
K ora come connettiamo l'rx e il tx del max 232? detto fatto:
ZZ7408B3EE.jpg

Come si vede dalla foto (i colori sono errati):

  • giallo tx
  • rosa rx
  • verde massa

Ora per poter passare il fw alla fonera dobbiamo scaricare il fw originale da sito di fon e poi estrarre da questo 2 file cioè: rootfs.squashfs kernel.lzma come facciamo ad estrarli? Da una linux box creiamo un file sh eseguibile fatto così:

SIZE=$(du -b $1 | cut -f1)
tail -c $((SIZE-519)) $1 > $1.tar.gz

e diamogli come parametro il fw scaricato dal sito di fon.

Lo script ci creerà un file tar da cui noi dovremmo estrarre i file precedentemente menzionati.

oppure se siamo davvero pigri li ho estratti io per voi e sono scaricabili a questi indirizzi:

rootfs.squashfs

kernel.lzma

Ora per passare i file alla fonera abbiamo bisogno di un tftp server io ho usato quello di winagents ( http://www.tftp-server.com ) ma qualunque voi usiate va bene.. Ora buttiamo nella root del nostro tftp-server i 2 file e abbiamo concluso la configurazione del tftp server.

Ora siamo pronti basta aprire hyper terminal e impostare la connessione sulla com (nel mio caso com1) e poi: bit per secondo: 9600 bit di dati: 8 parità: nessuno bit di stop: 1 controllo di flusso: nessuno

Connettiamoci con hyper terminal e ora accendiamo la fonera. Appena vediamo comparire

Executing boot script in 1.000 seconds - enter ^C to abort 

diamo ctrl-c e avremo la shell di red boot.

Diamo i seguenti comandi:

ip_address - l ip.della.fon.era/24 -h ip.adress.del.tftpserver
load -r -v -b 0x80040450 rootfs.squashfs
fis create -b 0x80040450 -f 0xA8030000 -l 0x00700000 -e 0x00000000 rootfs
load -r -b %{FREEMEMLO} kernel.lzma
fis create -r 0x80041000 -e 0x80041000 vmlinux.bin.l7
fis load -l vmlinux.bin.l7
reset

K ora se tutto è andato a buon fine al riavvio avremmo una fonera perfettamente funzionante col fw originale di fon.

Ringraziamenti:

La community di ninux poichè mi hanno spinto a tentare di costruire il circuito

Nbd, Heini e billbong per le dritte su redboot e su come cavolo creare le partizioni in modo corretto.

Written by Raffaele