Input

book: Create a structured PDF document with headings, chapters, etc.
webpage: Specifies that the HTML sources are unstructured (plain web pages.) A page break is inserted between each file or URL in the output.
continuous: Specifies that the HTML sources are unstructured (plain web pages.) No page breaks are inserted between each file or URL in the output.
Title of the document for the front page.
Extract the first heading of the document and use it as title. If checked the title field has no effect.
The title image or HTML page. These file has to be an attachments!
Specify document version to be displayed on the title page.
Intellectual property owner of this document.
Copyright notice for this document.
Information about who and when modified the document are applied at the end.

Output

Specifies the output format.
Grayscale document  Title page
Compression :   JPEG big images 

Pagina

 
User defined page size 
Choose one of the predefined standard sizes or select user defined.
Specifies the page size using a standard name or in points (no suffix or ##x##pt), inches (##x##in), centimeters (##x##cm), or millimeters (##x##mm).
Set the target browser width in pixels (400-1200). This determines the page scaling of images.
   2-Sided   Landscape


Specifies the margin size using points (no suffix or ##x##pt), inches (##x##in), centimeters (##x##cm), or millimeters (##x##mm). Keep empty for default value.
Left
Middle
Right
Sets the page header to use on body pages.
Left
Middle
Right
Sets the page footer to use on body pages.

Indice

Sets the number of levels in the table-of-contents. Empty for unlimited levels.
   Numbered headings Check to number all of the headings in the document.
Sets the title for the table-of-contents. Empty for default title.
Left
Middle
Right
Sets the page header to use on table-of-contents pages.
Left
Middle
Right
Sets the page footer to use on table-of-contents pages.

Colors

Enter the HTML color for the body (background).
Enter the image file for the body (background). These file has to be an attachments!
Enter the HTML color for the text.
Sets the color of links.
Enables generation of links in PDF files.

Fonts

Set the default size of text.
Set the spacing between lines of text.
Choose the default typeface (font) of text.
Choose the default typeface (font) of headings.
Set the size of header and footer text.
Choose the font for header and footer text.
Change the encoding of the text in document.
Check to embed font in the output file.

PDF

Controls the initial viewing mode for the document.
Document: Displays only the docuemnt pages.
Outline: Display the table-of-contents outline as well as the document pages.
Full-screen: Displays pages on the whole screen; this mode is used primarily for presentations.
Controls the initial layout of document pages on the screen.
Single: Displays a single page at a time.
One column: Displays a single column of pages at a time.
Two column left/right: Display two columns of pages at a time; the first page is displayed in the left or right column as selected.
Choose the initial page that will be shown.

Security

Check to number all of the headings in the document.
 Versione stampabile   Modify
 Copy   Annotate
Specifies the document permissions.
Specifies the user password to restrict viewing permissions on this PDF document. Empty for no encryption.
Specifies the owner password to control who can change document permissions etc. If this field is left blank, a random 32-character password is generated so that no one can change the document.

Expert

Specify language to use for date and time format.
Shrink code blocks on page.
Show line numbers for code blocks.
Make spaces visable by dots (·) instead of white spaces.
Make line breaks visable by a extra character (¶) at the end.
Enable this feature if you searching for problems or intent to report a bug report

About

Version 2.4.2 (MoinMoin 1.9.7)


MoinMoin - Generate PDF document using HTMLDOC

This action script generate PDF documents from a Wiki site using
the HTMLDOC (http://www.htmldoc.org) software packages which has
to be preinstalled first.

Copy this script in your's MoinMoin action script plugin directory.

Thanks goes to Pascal Bauermeister who initiated the implementaion.
Lot of things changes since then but the idear using HTMLDOC is the
main concept of this implementation.

Please visit the homepage for further informations:
http://moinmo.in/ActionMarket/PdfAction

@copyright: (C) 2006 Pascal Bauermeister
@copyright: (C) 2006-2010 Raphael Bossek <raphael.bossek@solutions4linux.de>
@license: GNU GPL, see COPYING for details


Italiano English
Modifica History Actions

ppp

Uso di ppp per l'autenticazione degli utenti su una infrastruttura wireless aperta

(RFC) Questo documento si propone di realizzare una politica comune di configurazione degli apparati in tutte le situazioni in cui uno o più utenti della rete volessero condividere la proprio connettività internet con un sottoinsieme degli utenti presenti nella rete comunitaria.

Per raggiungere questo scopo diverse soluzioni sono praticabili. Nonostante la premessa ppp viene considerato il miglior modo per AUTENTICARE i singoli utenti mantenendo un basso overhead sul protocollo di comunicazione e rendendo quindi la configurazione più generale possibile e utilizzabile anche su sistemi con scarse risorse quali i sistemi embedded.

Panoramica ppp

PPP è un protocollo di livello data-link il quale supporta autenticazione, compressione e error detect. Sono previsti due metodi di autenticazione Password authentication protocol (PAP) e Challenge-Handshake Authentication Protocol (CHAP)

Per i nostri scopi solo il CHAP è utilizzabile per un'autenticazione che possiamo ritenere minimamente sicura, la compressione inoltre potrebbe rivelarsi deleteria diminuendo il throughput effettivo su dispositivi con risorse limitate.

Da RFC1334:

  • PAP is not a strong authentication method. Passwords are sent over
    • the circuit "in the clear", and there is no protection from playback or repeated trial and error attacks. The peer is in control of the frequency and timing of the attempts. Any implementations which include a stronger authentication method (such as CHAP, described below) MUST offer to negotiate that method prior to PAP.

Nel seguito del documento si analizzerano le configurazioni server/client su sistemi linux Debian-Ubuntu/Openwrt.

Server Debian/Ubuntu

Installare pppd: sudo aptitude install pptpd

Modificare il file /etc/pptpd.conf aggiungendo localip:

localip 192.168.2.1
remoteip 192.168.2.3-238,192.168.2.50

Modificare il file /etc/ppp/chap-secret aggiungendo una riga per ogni utente:

# client    server    secret         IP addresses
pippo       *      pluto          *
paperino    *      pareroga       10.0.0.6

(Usare delle passwd migliori ;D)

Riavviare pptp sudo /etc/init.d/pptpd restart

Vedi anche http://www.howtogeek.com/51237/setting-up-a-vpn-pptp-server-on-debian/

Server OpenWrt

Installare e abilitare pptp:

opkg install pptpd
/etc/init.d/pptpd enable
/etc/init.d/pptpd start

In /etc/pptpd.conf modificare l'ip del server, ad esempio:

localip 192.168.2.1

In /etc/ppp/chap-secrets aggiungere gli utenti come spiegato per Debian.

A questo punto puoi configurare il routing/nat per i tuoi utenti oppure un proxyarp aggiungendo l'opzione proxyarp in /etc/ppp/options.pptpd

Vedi anche http://wiki.openwrt.org/doc/howto/vpn.server.pptpd

Client Debian/Ubuntu

Vedi https://help.ubuntu.com/community/VPNClient

Client OpenWrt

Installare pptp: opkg update && opkg install ptp

Se si ha LuCi installato si può scegliere di installare luci-proto-pptp

Modificare il file /etc/config/network aggiungendo il seguente blocco:

config 'interface' 'vpn'
        option 'ifname'    'pptp-vpn'
        option 'proto'     'pptp'
        option 'username'  'pippo' #nel nostro esempio
        option 'password'  'pluto'
        option 'server'    '10.0.0.1'  #l'ip del server
        option 'keepalive' '10'
        option 'ipaddr'    '192.168.2.5'
        option 'netmask'   '255.255.255.0'

Lanciare /etc/init.d/network restart per applicare la configurazione.

Vedi anche http://wiki.openwrt.org/doc/howto/vpn.client.pptp

Client Windows

Dal Pennello di controllo-> Connessioni di Rete

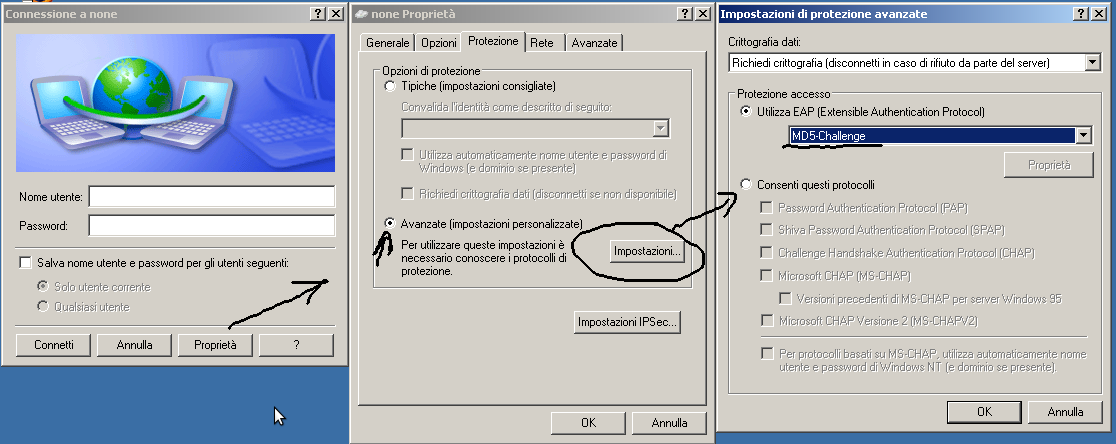
Sceglie Crea una nuova connessione. Connessione alla rete aziendale scegliere Avanti > Scegliere Connessione VPN scegliere Avanti > Inserire un nome per esempio "Internet da Gianni" Inserire l'ip del server pptp di riferimento.

Configurare la connessione appena creata: winpptp.png tag: PPPoE configuration for user auth in a open wireless infrastructure
Discussione

Versione iniziale claudyus il maggio 2012